Documenting your Python library, from zero to website
Documentation is quite a project, but your project is already a project, and who wants another project?

We will start with a totally empty project, and go all the way to a website hosted on GitHub pages, built automatically with GitHub actions.
You can see the final result here.
You can find all the code for this project on GitHub here.
Your library
I said we’d do it from scratch, so we will have to make a library. You probably already have a library, so you can easily figure out how to paste your files here, and skip to the next section.
Let’s create a library called autos. Create a folder for it and two files:
mkdir autos
touch autos/\_\_init\_\_.py
touch autos/bike.py
with contents for bike.py:
and the __init__.py file:
from .bike import *
Let’s also add a test tests/test.py in a separate directory:
Finally, let’s make this a real package by including a setup.py. You can use a generator, or just steal the default one from packaging.python.org — create setup.py with contents:
Obviously, edit it as you see fit. Here you will also need a README.md to serve as the long_description (and because) it’s good practice:
touch README.md
The final directory structure should look like:
autos/\_\_init\_\_.py
autos/bike.py
setup.py
README.md
You should now be able to install the library
pip install .
The test script in the tests directory should produce:
Riding: SR400 on road: 101
Great! On to the documentation.
Adding documentation
Let’s start by adding some documentation. If you are using VS Code (which you should be!), you can use the Python Docstring Generator to help you out.
First add typing declarations to all the method arguments and return values:
Some other common types are:
List, e.g.List[int].Tuple, e.g.Tuple[str,float].Dict, e.g.Dict[str,int].Union, e.g.Union[int,None]could beintorNone.
Go under one of the method signatures and type ”””. It should suggest the documentation string:
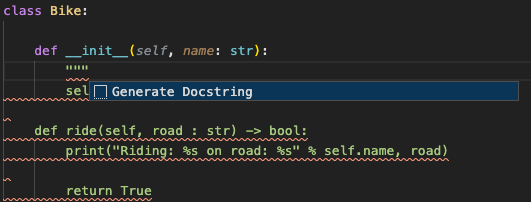
Then hit enter to autocomplete the documentation:
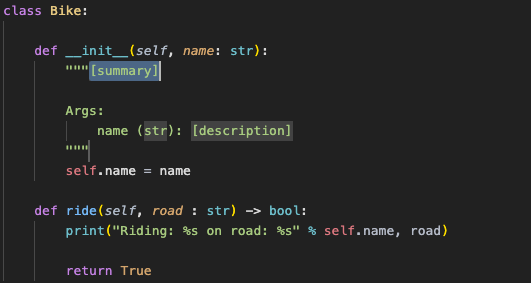
Fill in some documentation, for example:
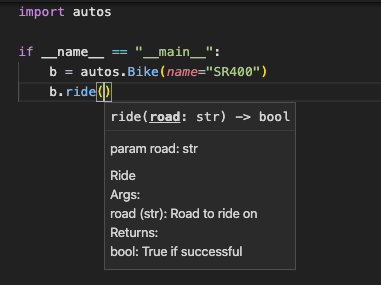
The neat thing here is that editing the test.py should in any modern IDE (e.g. VS Code) now give you autocomplete suggestions:
Generating the website
You need to install Sphinx:
pip install -U sphinx
If you are on Ubuntu, possibly you will instead want:
sudo apt-get install python3-sphinx
Let’s make a new docs folder:
mkdir docs
cd docs
Use sphinx-quickstart to get started:
sphinx-quickstart
Choose all the defaults, i.e. no for > Separate source and build directories (y/n) [n]:. For project name, I chose autos.
You should now have in the docs folder:
\_build/
\_static/
\_templates/
conf.py
index.rst
make.bat
Makefile
The Makefile is obviously used to build the project. conf.py specifies the build, and index.rst is the entry point for the website.
To make the website, run:
make html
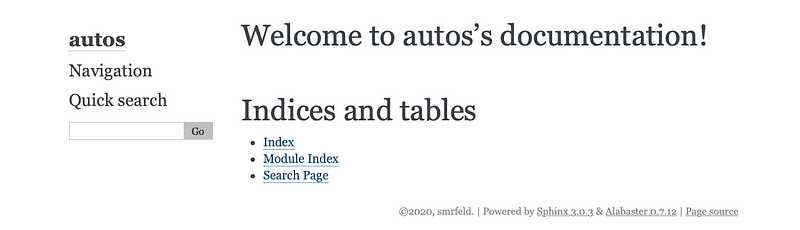
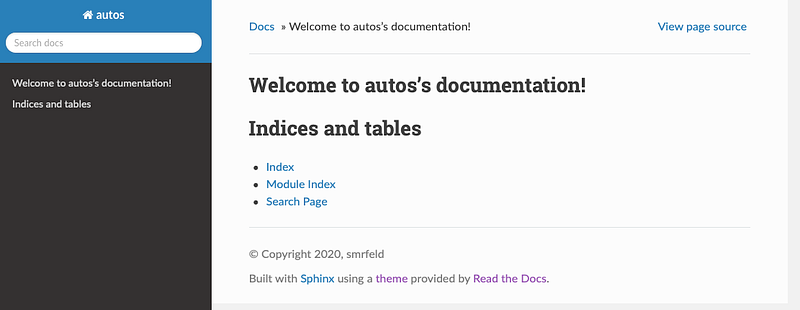
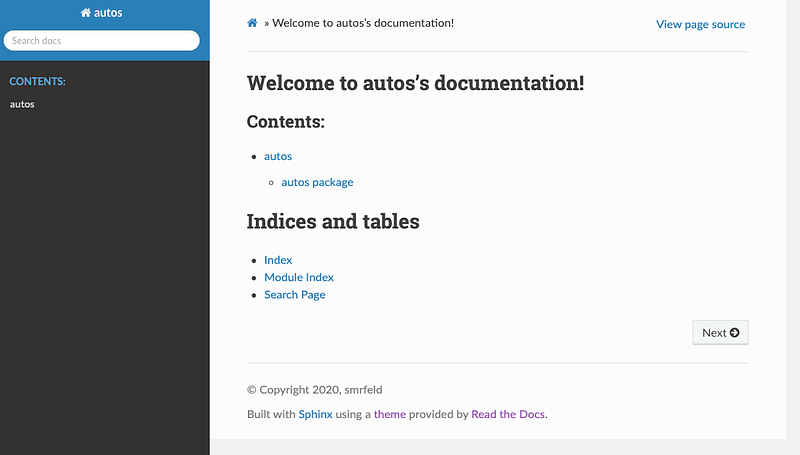
To make different targets, try just make to list all possible targets. The resulting pages will be in _build/html. The default page looks like this:
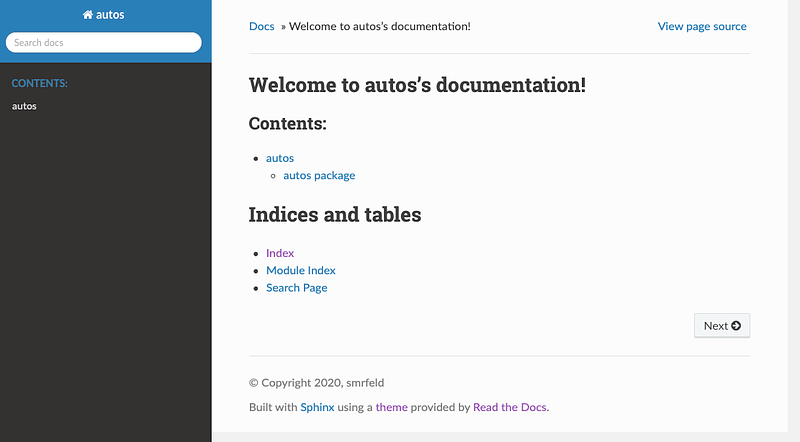
I always like the ReadTheDocs] theme. Go ahead and install it:
pip install sphinx-rtd-theme
Let’s add it to the configuration in conf.py. Add the import statement, and add the rest:
Now we get:
That looks better! But we don’t yet have our doc strings we wrote in Python appearing.
Autogenerate RST files
Converting doc strings into documentation is done using the sphinx.ext.autodoc extension as described here. Go ahead and add it to the extensions list in conf.py:
extensions = [
   “sphinx\_rtd\_theme”,
   “sphinx.ext.autodoc”
]
In order for specific classse to appear in the documentation, there must be an RST file referencing them. An example snippet in a .rst file might look like this:
.. automodule:: autos.bike
   :members:
   :undoc-members:
   :show-inheritance:
which shows that the autos.bike class should be documented here. If you’ve never written RST before, note that it is extremely space and indentation sensitive!
Let’s automatically generate them. From inside the docs directory, run:
sphinx-apidoc -o . ../autos
Here -o . specifies that the current docs directory is the output, and the ../autos specifies the source directory. We obtain two new files:
autos.rst
modules.rst
with contents for autos.rst (note: you may have to view these in raw format!):
and for modules.rst contains a running list of the modules:
Finally, we need to connect these new files to the original index.rst. Add a reference to the modules.rst in index.rst:
Fire up the make command again:
make html
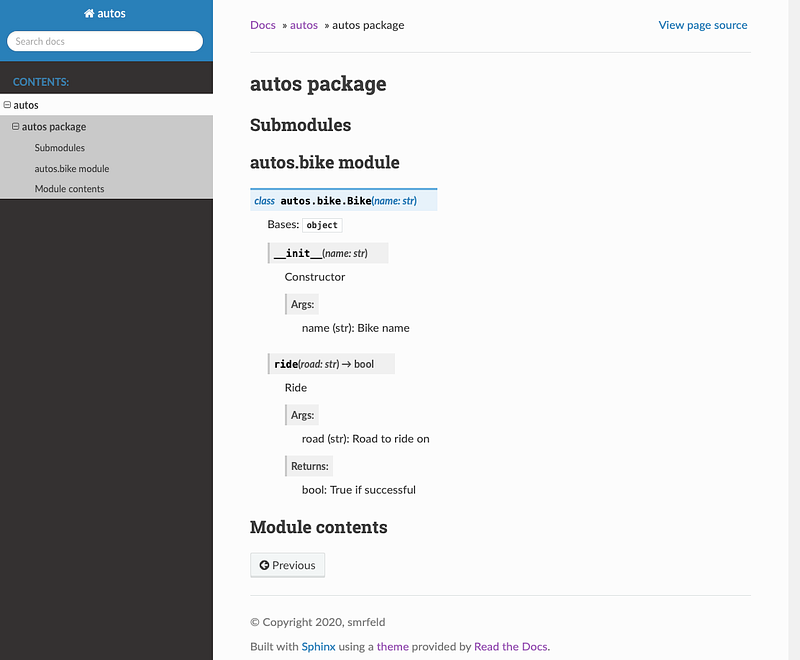
to obtain the following:
This almost worked. We notice that for the class documentation, we are missing the docstrings for the constructor!

For some brilliant reason, the __init__ method is skipped by default! Let’s fix that using this trick. Add the following snippet to conf.py at the bottom:
Rebuild, making sure clean first:
make clean html
make html
and you should find the constructor is now documented:
Hosting your documentation with GitHub
Start by initializing a git repo with git init . for the folder which has contents:
autos/
docs/
tests/
setup.py
README.md
You should also use a .gitignore with at least:
\_\_pycache\_\_/
.DS\_Store
docs/\_build/
docs/\_static/
docs/\_templates
Commit the remaining files in the repo, then go on GitHub, create a new repo for this project and push your first commit.
git add .
git commit -m “Initial”
git remote add origin <https://github.com/...>
git push — set-upstream origin master
Let’s create a new GitHub Actions workflow. They live in a .github/workflows directory that does not yet exist. Create it:
mkdir .github/
mkdir .github/workflows
touch .github/workflows/docs.yml
open .github/workflows/docs.yml
Give the file the following contents:
Let’s break it down:
name— obviouson— you can add different triggers here. Here we build the docs on every push to master. You can also do e.g. pull request.docs job— this is the only job here, which will build the docs.runs-on: ubuntu-latest— You can choose from a couple differet runners other thanubuntu-latestas described here.uses: actions/checkout@v2— very important! Without this, we don’t actually check out our repo!Install Python— get the latest 3.8 Python — turns outubuntu-latestis not-so-latest.Build docs— themake htmlcommand from before. Make sure we do it in the docs directory.Deploy— deploy the pages indocs/_build/htmlto thegh-pagesbranch such that your docs become visible to the world.
Add, commit and push the workflow. You can monitor the progress of the action on your repo page under Actions.
Your website should then be available under:
<https://username.github.io/repo_name>
Mine didn’t appear right away. Check your settings on the “Settings” tab under “GitHub pages” — they should automatically have changed to build from the gh-pages branch:
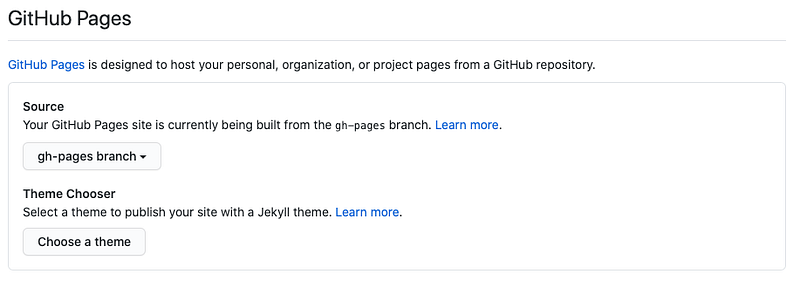
I had to manually change this from gh-pages to master and back to get the website to become available. It should then also automatically list the URL here.
You can also check your gh-pages branch, which should containt your HTML files:

A common problem in the build process is that you used some external library that you installed with pip install external_library. Now what — should you add it to the build process for the documentation? No — this only adds more dependencies that need to be installed, and it’s probably not relevant for the docs. Instead you can edit in conf.py the option:
autodoc\_mock\_imports = [
   “external\_library"
]
such that the build process for the docs will proceed even when the library is missing.
Final thoughts
Your final docs are now online, and building every time you push to master!
Finally, we can complete this guide by adding a badge to your README.md that your docs built:


Thanks for reading!
Contents
Oliver K. Ernst
July 30, 2020