Set up GitLab CI/CD for testing your Firebase functions
It’s all about those “pipeline: passed” badges.

In this guide, we will set up GitLab CI/CD for testing your Firebase functions.
Set up the tests
Let’s start with the setup of the tests. Assuming you have two projects: a production project and a development project with ID <YOUR_DEV_PROJECT_ID>, I’ll assume you want to run the tests on your development project. I’ll also assume your directory is organized as follows:
firebase.json
functions/package.json
...
functions/src/index.ts
functions/src/... other .ts functions
...
functions/test/index.test.ts
functions/test/... other .test.ts tests
By default, tests are done with the mocha framework. Other guides exist to use jest . We’ll also use chai for the assertion library.
Follow Google’s guide to setup the test functions after installing the dependencies:
npm install --save-dev firebase-functions-test
npm install --save-dev mocha
In this case, we will modify the suggested script in package.json. Add the following script to package.json :
"scripts": {
   "test": "firebase use <YOUR\_DEV\_PROJECT\_ID> && mocha -r ts-node/register 'test/index.test.ts' --exit --timeout 10000 --require mocha-steps"
}
- First we switch to the development project with
firebase use <YOUR_DEV_PROJECT_ID>. This isn’t strictly necessary, but it can be easy to forget it! - Next we run the tests with
mocha. - We run only the tests from the
test/index.test.tsfile. You could run all tests in thetestdirectory by switching this totest/*/**, but then you may have tests running which aren’t ready yet. - We increase the timeout from the standard 2 seconds (2000 ms) to 10 s (10000 ms) because, well, sometimes firebase is slower than expected.
- We use
--require mocha-stepsto be able to usestepin the tests in place ofit. The difference is thatstepstops the other steps from being executed once one of them fails.
After you’ve written the tests, you can run them with:
cd functions/test
npm run test
The .gitlab-ci.yml file =======================
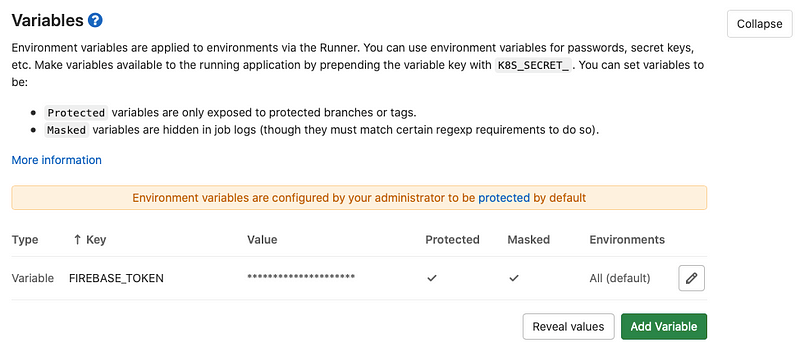
First we need to generate a FIREBASE_TOKEN for your testing. You can get the token by running in the command line:
firebase login:ci
After you log in, you’ll get the token.
The recommended way to set the FIREBASE_TOKEN variable is to set it to FIREBASE_TOKEN in the GUI on gitlab.com under Settings/CI CD/Variables. You can then use the variable in your .gitlab-ci.yml file.
In the top-level directory of the project, we’ll add the .gitlab-ci.yml file to set up the pipeline for running the tests:
- We start with the latest node image.
- Install the
firebase-tools. - For the actual script: go into the
functionsdirectory and install the dependencies. - Then set the Firebase project using
firebase use <YOUR_DEV_PROJECT_ID>where you replace your project ID. - Then store the
fb.tokenflag to contain the token and save it to a runtime configuration using:
firebase functions:config:set fb.token=$FIREBASE\_TOKEN
firebase functions:config:get > .runtimeconfig.json
The motivation for this is the need to use the token for some function calls. For example, the following recursive delete snippet to delete a path:
return firebase\_tools.firestore
.delete(path, {
project: process.env.GCLOUD\_PROJECT,
recursive: true,
yes: true,
token: functions.config().fb.token,
})
which will give you the error:
TypeError: Cannot read property 'token' of undefined
unless you have set the fb.token in those two lines above. An alternative way is described here using:
test.mockConfig({ fb: { token: <FIREBASE_TOKEN> }});
- Finally run the test with
npm run test. - With the
onlysection, we define these changes to only occur when changes to thefunctionsdirectory occur on themasterbranch.
Testing your GitLab pipeline locally
Unlike GitHub actions, GitLab supports a nice local runner environment called gitlab-runner . Install it:
brew install gitlab-runner
Then set it up:
gitlab-runner register
- For the URL, use
https://gitlab.com/. - For the token, go to your project on
gitlab.comand go toSettings/CI CDand toRunnersand look underSet up a specific runner manuallyfor the token. - For the description, enter whatever you like.
- For the executor, enter
shell.
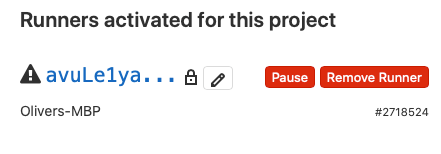
You should then see your runner on the Settings/CI CD online.
You can then test your pipeline using:
gitlab-runner exec shell test-functions
where test-functions refers to the section in the .gitlab-ci.yml file above.
Hopefully, you’ll be able to get the job to pass! You’ll likely have to commit any changes to .gitlab-ci.yml before running the runner. You can use the amend function of git to edit the file multiple times.
Once you are done, push the .gitlab-ci.yml file and you should see online:

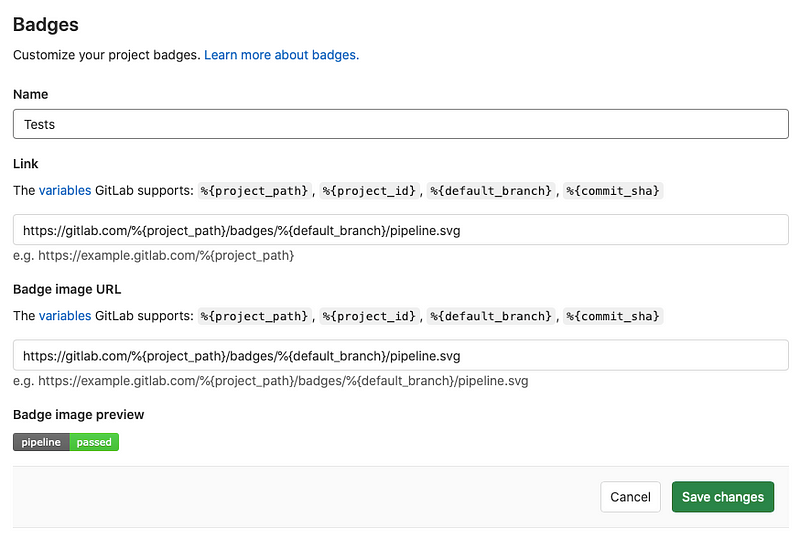
Adding a badge to your repo
You can add the badge to the repo under Settings/General/Badges as shown below.
Final thoughts
I hope you got your tests up and running!
Contents
Oliver K. Ernst
August 25, 2020